- New - A guide to making a Pistol/Gunslinger Build
- New - A guide to making a Melee Build
- New - Scav Magazine - All locations and details
- For New Players - Read the walkthrough.
- New - Open Season
- New - Power Play Quest
- New - Raider Outposts
- New - Nuka World Endings Guide - Options and Benefits
- The Grand Tour
- Faction Perks and New SPECIAL Ranks in Nuka World
- Gage (Companion)
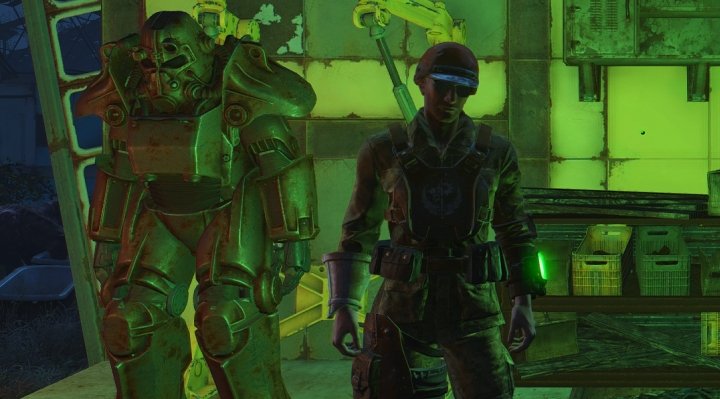
Fallout 4 Character Guide
Stats, Inventory, Pip-boy Info, Resistances, and Quests
 My Sole Survivor in Fallout 4. This guide teaches you to navigate all the menus of the Pip-boy and help you understand the stats and options that are thrown at you.
This Guide seeks to discuss the various attributes of your character in Fallout 4, as viewed from the Pip Boy. I'll provide some tips that may be helpful as you go along. We'll look lightly at the mechanics of damage reduction, carry weight, get you info on SPECIAL stats, and managing your inventory and quests. Knowing more about how the character and the info presented in the Pip-boy works, we can better make use of these gameplay systems and character stats.
Character Attributes
 Your HP, Level, and AP are displayed at the bottom of the Character Stat Screen on your Pip-boy
The Sole Survivor has a number of stats that affect what they can handle in terms of combat and interaction with the world. Here is a listing of the Character stats you will see when viewing your Pip-boy's various screens:
Status Screen
Here you can view the main stats of your character in Fallout 4 - At the bottom, we see:
- HP - Hit Points - this is how much life you have. At 0, you die. You can eat foods and drink water, use Stimpaks in the pip boy's inventory > Aid screen even during combat, but know that HP recovers over time, though fairly quickly. You gain HP each time you level, based upon Endurance. Don't worry though, maxing endurance later will give you points retroactively. Radiation damage gradually lowers your HP. For every 10 Radiation you take, your HP will decrease by 1%. Use RadAway to remove 300 points of Radiation. This, along with Stimpaks, is improved with the Medic Perk.
- Level - The current level and the amount of Experience Points (XP) needed to Level Up, gain HP, and gain a Perk Point. See that guide to learn about gaining XP. In short, discovering locations, defeating enemies, building things in Settlements, passing speech checks during dialog, and upgrading armor/weapons will grant you experience, as will completing quests (the largest gains). You can get +10% more XP on top of your +3% per Intelligence bonus by sleeping in an owned or rented bed - not some random bed you find in an abandoned shack.
- AP - Action Points. These are used in the Vault Assisted Targeting System, or V.A.T.S. during combat. It can let you choose a body part to hit, and slows time while you use it. Gain more by using light gear with an energy symbol indicated (small gains) or get +10 AP for every point of Agility you have. AP are also consumed while sprinting - the drain is lessened with higher endurance.
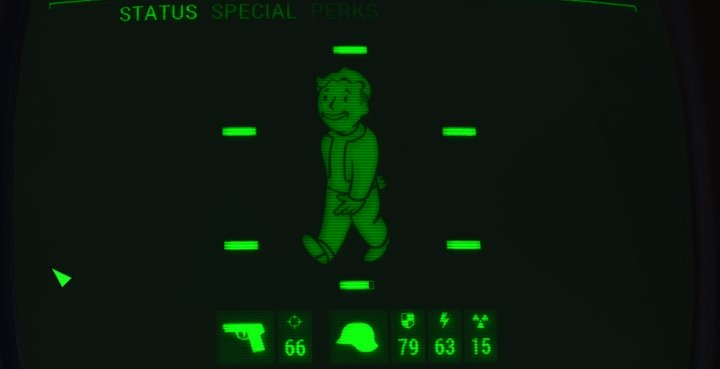 Your character's main stats are Damage (equipped weapon), then Damage, Energy, and Radiation Resistance. There is much more to a build, in the form of Perks, but these give you a general idea on basic combat capabilities.
On the central part of the Status screen we see if we have any broken limbs. The character's icon will change to have bandages and appear injured. If this happens, a Stimpak or trip to the clinic can repair those limbs. Damaged legs inhibit your ability to move, arms your ability to aim, and head your vision. We also see the main stats that determine our prowess in combat:
- Weapon Damage - The damage of the currently equipped weapon. It is recommended you carry a few types of weapons - at the very least for close range and sniping, with one weapon you use for weak enemies to avoid wasting higher caliber ammunition on them. Note that this does reflect any perks for that weapon type, modifications you've made, drugs in effect, or foods you've eaten that give damage buffs - you will also see this reflected on the weapon. Please note this is what damage you'd do to an enemy with 0 resistance - all enemies have some resistance, and some are immune to certain types of damage, most notably radiation.
- Damage Resistance - This is your resistance to most types of damage in Fallout 4. The higher the better. The damage you take is some complex math, but based on the ratio of resistance to damage the enemy can deal. It helps most to reduce the damage of powerful enemies, while low-level creatures can still hit you and gradually whittle you down. Everything does less damage, but the reduction is more dramatic for powerful attacks.
- Energy Resistance - A different type all together. Laser-type weapons will deal less damage to you with this stat being higher. It functions the same as above. Metal armor has less energy resistance due to its conductivity, while leather has more. Combat armor offers balanced protection. Note most Raider armor is made of metal, but early-game most attacks are ballistic and not energy.
- Radiation Resistance - This lowers the rate that radiation gets to you. Lead-shielded armor can reduce it, as can gas masks. Being in Power Armor reduces radiation the most, as will Rad-X, a drug which grants you a large amount of resistance. Use it when you must go into an area with nuclear waste to grab some loot, or when fighting a strong enemy that is putting off a Radiation aura, such as a 'glowing' enemy!
S.P.E.C.I.A.L. Stats and Perks
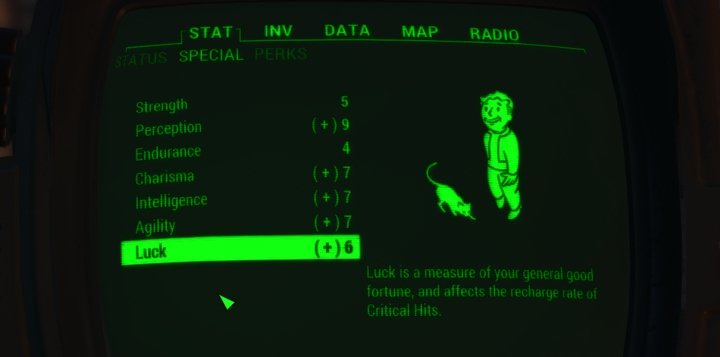 SPECIAL Stats all increase a specific aspect of your character. See that guide for info on what each stat does, as well as where you can find the Bobblehead to give you a permanent +1 in that stat.
On the next 2 screens of the Pip-boy, we can see the SPECIAL stats (with buffs factored in) and Perks of our character.
SPECIAL - all of these increase something about your character, and can be viewed on the next screen of the Pip-boy. I've got a guide to the Special stats and what they do which should help you, but know the main role of these is to unlock Perks - perks are always more powerful than base SPECIAL stats, though some effects can only be gained from SPECIAL (mainly persuasion attempts in NPC dialog).
Perks
This is where you'll ultimately determine your character's build. Most players will want some points in Armorer, Gun Nut, Science, Hacker, and Lockpicking, but the others are what determine your bonuses in combat, resistances, unique bonuses like reducing the addiction potential of drugs, and your ability to alter Settlements. Earlier on (10-20 range) the Scrapper Perk is of great help, providing you plenty of screws, aluminum, copper and others to help you craft better mods to weapons. Later, when enemies drop more energy weapons and more advanced ballistic types, you'll want Rank 2 in this so that you can get the much more rare components (aluminum, fiber optics, nuclear material) from scrapping weapons and armor.
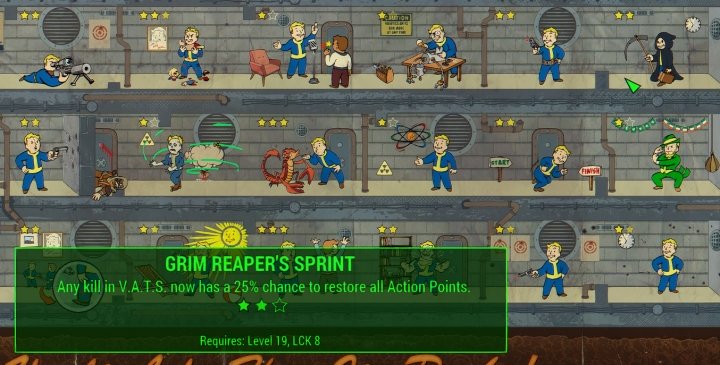 The main Perks screen has perks you can choose on level up, but that in the Pip-boy will show you those from magazines, bobbleheads, and comic books you've read, as well as hidden companion Perks that benefit your character.
Listed also on this page are any unique perks you've picked up. These won't be found on the actual Perks chart. Reading magazines, getting unique bobbleheads like speech and repair, along with comic books can all give you unique perks with various ranks for each one you find. These are passive bonuses you don't have to pick, it's just not a certainty your build will benefit from melee damage if you're fighting only as a ranged character.
Managing Loot - The Inventory Screen
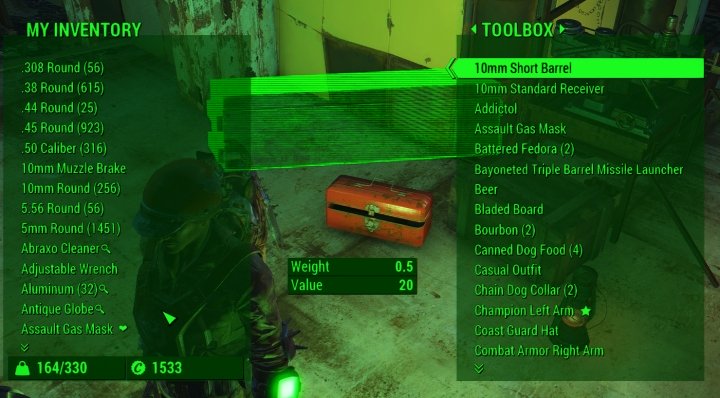 Store items safely by putting them in a container in one of your Settlements. Please note the distinction between crafting station inventories - which you use to store junk and crafting/cooking materials - and places like this toolbox where you just put items you may use later.
Carry Weight
On the Inventory Screen, you can see your Carry Weight. Most items (save ammo, bobbleheads, holotapes etc.) have a carry weight. With your base carry weight of 200, you'll also gain +10 per Strength point you have (pocketed gear mods also raise carry weight). You can feel free to transfer these items to your companion by trading with them (Dogmeat or another) until you get back to base and organize your inventory. You can see a button on the bottom while in the trading screen that will let you sort by various factors, including weight (WT). This helps for transferring your burden to a companion - get rid of the heavy stuff first, as it's faster.
It's suggested that upon return to your base you store items that break down into components (under the junk tab) or can be planted (tatos, mutfruit) inside the Settlement's crafting stations, where you can store all junk at once with the press of a button, then move vegetables and uncooked meat there manually. You can access these for upgrading weapons and armor, using the chemistry station, or cooking so long as they're in the settlement's inventory, which is shared in all crafting stations.
Choose another container (or more) to organize items you may want in the future, whether to outfit your Settlers with better gear, or weapons you may want but have little ammo to use at the present. Legendary armor cannot be broken down and must either be stored or sold. Breaking down all but the lowest tier armor and weapons without the Scrapper perk is not recommended.
Inside your own Settlements, it is safe to pick a container to store items inside without worry of someone stealing it. I'm talking about armor and weapons, drugs, etc. - not things you use to craft, which should always be in the Settlement's workshops. They will also not expire after a certain amount of time, so it's safe and reliable storage. I prefer to set something up near my crafting stations. You may want to put healing items, weapons, and armor into three separate containers so that it's easier to find things before heading back out. I use Sanctuary as my main place, others use Red Rocket Garage and other Settlements. Filing Cabinets and Toolboxes can be crafted under building mode > Furniture > Containers, hold as many items as you'll ever need and will not take up much space.
Inventory > Weapons
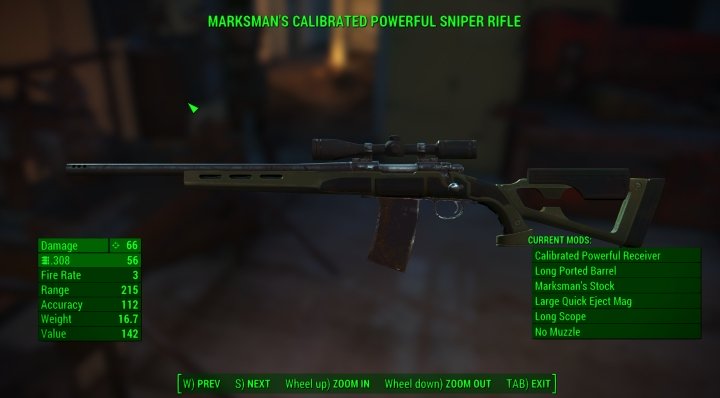 Weapons can be inspected to see them up close - this also shows any modifications they have installed.
You can equip weapons by going to the Inventory > Weapons screen. The only weapon stat covered above is damage, but you will also see other factors - range, accuracy, rate of fire, weight, and value. Here's a brief explanation of each so that you can understand them:
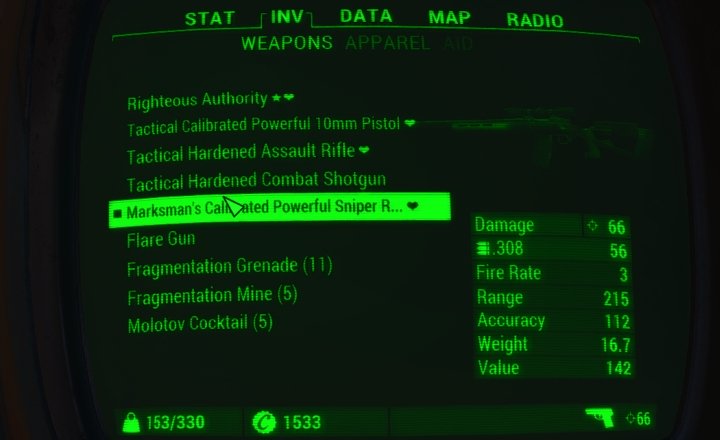 Weapons with a star are unique weapons, which can't be broken down. This with a heart are favorited weapons.
- Damage - The damage of the weapon including mods, multiplied by any perks you have that increase specific types of weapons' damage.
- Ammo Type - Unfortunately, clip size isn't currently shown - but it does show you the ammunition type that weapon takes and how many of it you have, so you can decide if it's worth using the weapon - have a shotgun with 3 shells? It might not be worth carrying until you find more.
- Fire Rate - A relative score of how fast a weapon can fire the next round. Higher is better, and the higher it is the less AP it takes to fire in V.A.T.S.
- Range - A relative rating of how far the weapon can fire and hit a target. Outside this range, there will be a greatly reduced (and possibly 0%) chance to hit.
- Accuracy - Higher accuracy means a greater chance to hit when inside the weapon's effective range. This seems to tighten the hit box when you're not aiming the weapon. It makes a big difference to the chance to hit in V.A.T.S. if the enemy is not behind cover and you're within range. Your Perception further increases the accuracy when used in V.A.T.S.
- Weight - This is mainly about how heavy it is to lug around, though it does seem big heavy weapons take longer to pull out.
- Value - What it's worth at 100% sell value - you can expect merchants to give you far less, but it's a good relative indicator. You get closer to this sell value with the Cap Collector Perk and higher Charisma.
 Favoriting weapons allows you to quickly switch to it during combat, great to pull out a shotgun or scatter laser when an enemy comes in close. You can do this in the pip-boy, it's just faster.
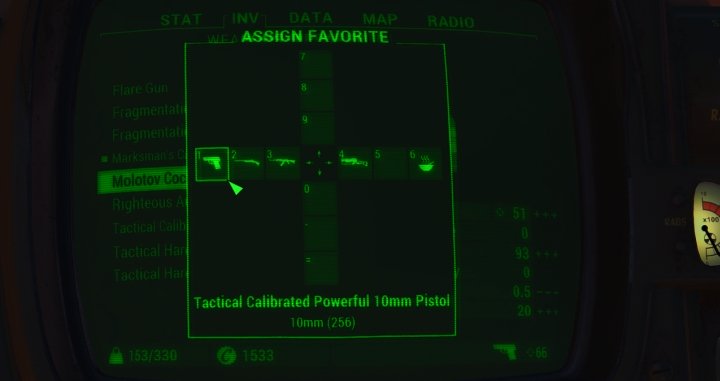
Favoriting Weapons
An important aspect of Fallout 4 is favoriting weapons. From the weapons inventory screen, you can press to set Favorites. I favorite at least 3 guns (one for trash, one for long-range, and one for close range) but sometimes have up to 5 weapons favorited. Once favorited, you can easily pull these out in the thick of combat, although going into the pip boy will let you do so immediately, it is very handy to be able to switch your favorite weapons on the fly. It's also a good idea to put a healing item on the favorites menu, so that you can quickly heal up - though this is sometimes best done from the pip boy menu, it's good for after combat when things are not hectic.
Some players name their weapons after the ammo type, so that they start with 10mm for example and will appear first in the list. It helps to compare them when you find a new one. You can rename weapons while at a weapons crafting station.
Inventory > Armor
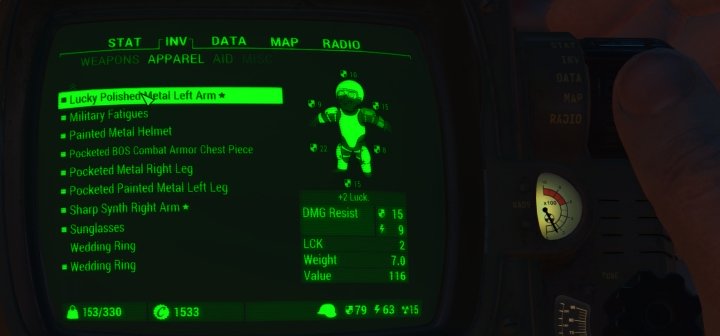 Apparel lists all the armor your character has in the inventory. Armor can also be favorited, but it's generally a waste of a slot on the favorites menu unless you need to quickly pull out a gas mask to improve radiation resistance.
The Stats from the status screen section above are all found on armor. You can go to the Inventory > Apparel screen to see your currently equipped armor. You can wear one item UNDER your armor (such as the Vault 111 Jumpsuit), and up to six pieces of actual armor - head (can include helmet and glasses, or one face mask), chest, two arms (left and right), and two legs ( left and right). The basic stats you'll see for armor are listed above (resistances), but also look for SPECIAL stat bonuses like +strength or +perception, +luck is also useful. These can help you decide which armor is best.
To help you with organizing this, you can rename items when you're at the crafting station. You could start all the gear you want to use with 'My' or something else so that it's always lumped together in the armor list, though you can probably come up with something more clever.
If you select a jumpsuit-type item and it flashes all of your armor pieces, they will all be removed in order to equip it. Items like Raider Leathers and Harness are good for equipping your Settlers who are assigned as guards, so they can have a higher defense rating in combat. You can then put them in the aforementioned 5-6 pieces of armor so they benefit fully. Try to get them in at least Raider armor, if not better. This armor is basically junk made of steel, and you should have plenty of that so it's not worth selling and not worth keeping - give it to a Settler in need.
Other Inventory Screens
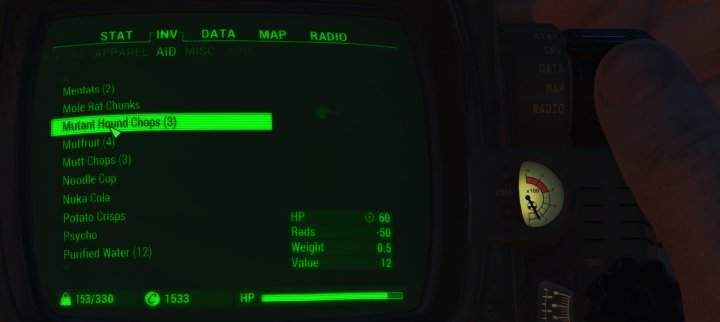 All the inventory areas of the Pip-boy can be sorted by various factors including value and weight, in order to help you organize. This shows the aid screen, where you can also favorite items in order to heal your character.
You will also find the Aid screen under Inventory, where you can find the items that will heal you. These can be favorited just like weapons. Try to cook meats and purify water at the cooking station so that it does not increase your Radiation level, which lowers maximum HP. There are also drugs here, but constant use will get you addicted. Use them in a tough battle to give you an edge. Know that addiction will have the opposite effect when your character is in withdrawal. Healing items take time to work. You can freely pause combat and use some foods while watching the bar at the bottom. This will let you know that you've used enough food/meds to heal your HP to full.
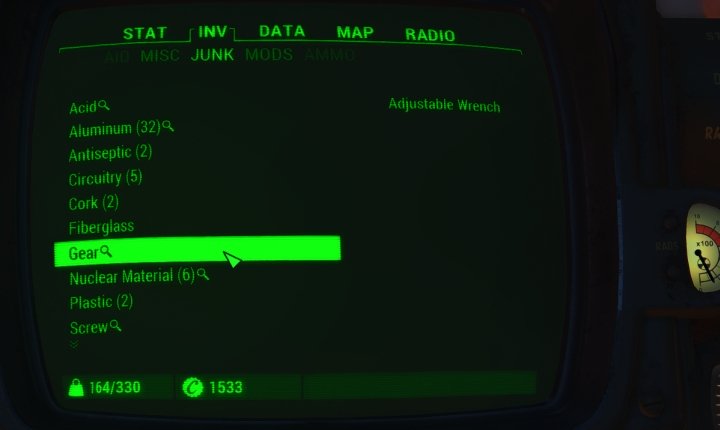 On the Junk Screen, you can tag components for search, meaning you'll see a magnifying glass next to items that break down to components you need when looting corpses and containers.
Tagging Components for Search
This is definitely something many new players won't notice. You can go into component view on the Junk screen, which lists all the junk items that break into various components and upgrade/building materials you've found. You can, from here, press the button to 'Tag for Search'. Select the components you'd like to find more of, and when you're out looting, if an item breaks down into one of those - say desk fans for screws, or cafeteria plates for plastic, it will have a little magnifying glass next to it. Scrapper Rank 2 will actually highlight items that have components you've tagged for search, so there's less chance of you missing them.
Other Pip-Boy Screens: Data and Map
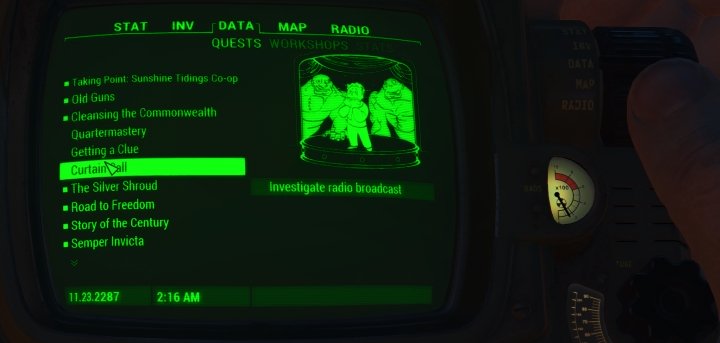 Track quests on the Quest screen, and they'll appear both on your compass and the world map. It's very handy to only tag a few at once, so that you don't get disoriented and start going the wrong way.
Quests
You will additionally find a Data tab on the Pip-boy. This will help you keep track of the quests you've been given. Many to help a Settlement are timed. You will find calls to defend your Settlements under Miscellaneous after a notification has appeared in the top-left of your screen, as though you got a new quest. Defending your settlements is important if you want to grow them over time. The Quests you've chosen to track (of which you can select a few) will all reflect on your main map and compass to help you navigate to locations you haven't yet discovered.
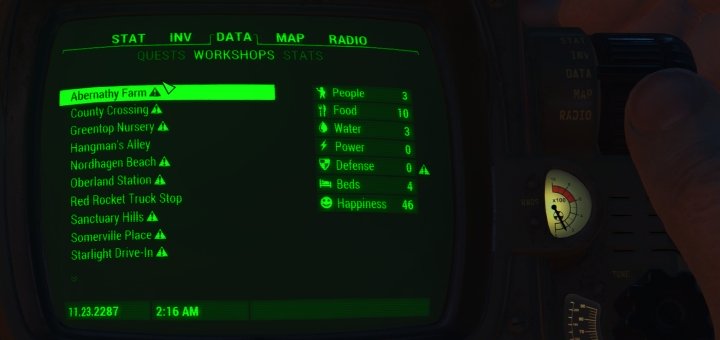 The Workshops tab lists all your Settlements and their stats. You can use this to find those that need a little attention, either a new defense or extra water, while also keeping track of population.
Under Data > Workshops you will see a listing of all of your Settlements, along with their stats. When you see caution signs next to them, it means they're too low - you're short on beds, don't have enough defense to keep the population happy, or not enough food/water to take care of them. You can fix this without lugging around equipment by making Supply Lines with Local Leader, though you can get a Settlement started earlier in the game by carrying some components with you - you'll not likely need wood or steel, but will need circuitry, copper, screws, and more rare items like that in order to get a Settlement attractive to newcomers. Settlement recruitment beacons are important to get new people coming in. Idle Settlers will help you by occasionally finding items and adding them to the Settlement's stores. To learn more about Settlements, view this guide.
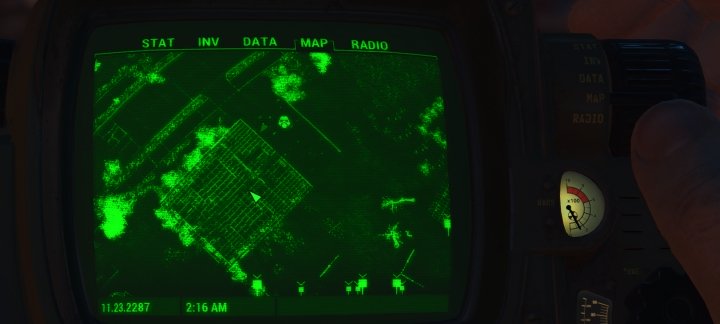 A local map in Fallout 4. Not very useful here, but in a large building it can be very helpful for getting out or finding rooms you haven't yet looted.
Map
Then, of course, there's the map. You can view it in local or world mode, so that you can possibly see unexplored areas in your immediate surroundings, or just see a direction you'd like to head where no new areas have been explored. You can fast travel any time so long that enemies aren't around. If, on the way to a new quest, your inventory is filled, try to discover a new location that is on the way. This will let you fast-travel back home, then return to this location and resume your journey. This is great for offloading junk and any weapons/armor you've found while exploring Fallout 4's huge world.
Contact
I hope you found this guide helpful. If you think I've missed something people would like to know about, please email [email protected] with a suggestion.
More Fallout 4 Guides
Share Tips and Strategies Below
- Raider Outposts in Nuka World
- Nuka World - Play as a Raider in this DLC
- Far Harbor - Learn about the DLC, its secrets, and read walkthroughs
- Automatron - Guides to building bots and quest walkthroughs
- Settlements - An in-depth guide to Settlements and managing them
- Melee Build - the best perks for a melee character
- Sneaking - Learn to be stealthy
- Critical Hits - Shots to Crit and Crit damage mechanics
- Tips for Making a Build - General advice for creating your own build
- Action Points - AP and all the things that affect it
- VATS - all about the V.A.T.S. and AP usage on weapons
- Gameplay Tips - pointers that will help new players
- Making a Sniper Rifle Weapon mod examples. Heavy hitter and fast-firing Comparison - two guns from the same base.
Share Tips and FAQs
Nothing yet.Join In