- New - A guide to making a Pistol/Gunslinger Build
- New - A guide to making a Melee Build
- New - Scav Magazine - All locations and details
- For New Players - Read the walkthrough.
- New - Open Season
- New - Power Play Quest
- New - Raider Outposts
- New - Nuka World Endings Guide - Options and Benefits
- The Grand Tour
- Faction Perks and New SPECIAL Ranks in Nuka World
- Gage (Companion)
Fallout 4 Nuka World DLC Quests
Taken for a Ride Walkthrough: The Gauntlet
Taken for a Ride Quest: The Gauntlet
 The Taken for a Ride Quest: Surviving The Gauntlet and Making it to Nuka World
The Gauntlet is a sick show for the pleasure of a mysterious audience, somewhat like the Saw movies. The main thing a guide could tell you to get through this area safely is to watch carefully for traps, and maybe take pictures of the worst. Save scum if you don't feel like repeating areas, but it's more entertaining to make it through in one pass. In the Gauntlet, if something looks suspicious, it probably is and could endanger your character. This is a high level area after all.
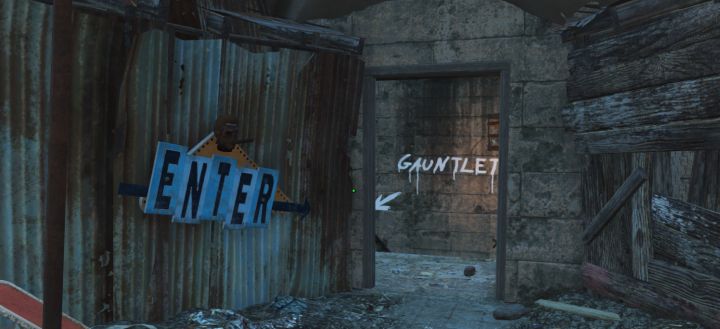 Entering the Gauntlet
Before you begin your run on the Gauntlet, check the computer in the main terminal area for some.. lore (bodies throughout the area may also reference things, such as a Minigun named Fate!). Throughout the gauntlet keep a look out for Nuka Tickets and Nuka Tokens throughout this entire area. They may come in handy later! This should not be a problem as you should be aware of your surroundings.
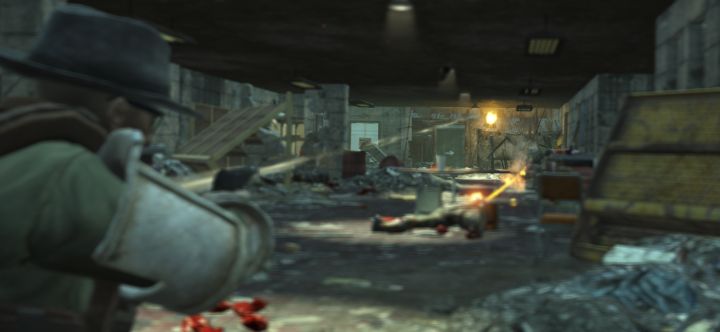 Multiple Turrets are in this room. It's almost standard fare, though they can take you by surprise. The Gauntlet is kind of long, so avoiding losing health (and thus supplies) is important.
Turrets
In the first large room of the gauntlet, there are about 6 turrets you must fight. However, not all of them can fire at you at once. They're meant to take advantage of blind spots and pop up on you. Stealth can help you know when you're about to be fired upon when first going into the area.
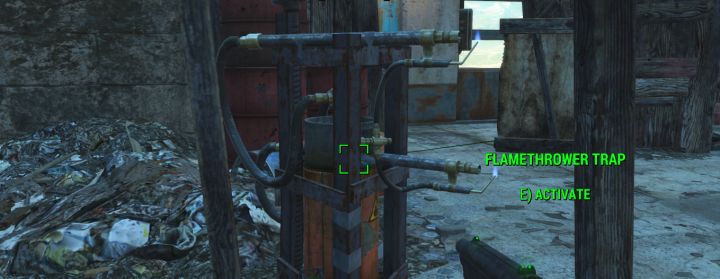
 Flamethrower traps and tripwires, so you know what to look for while traveling the Gauntlet.
First Traps
The next room, look for a flamethrower trap immediately to the left. There's another at the end of the hall, as well as a shotgun-laser and pipe pistol trap around the corner from the second flamethrower. To the left of the entrance is a master-level locked door that only serves to help you get around those two traps. If you can't, just watch for tripwires on the ground. Easily avoided, regardless.
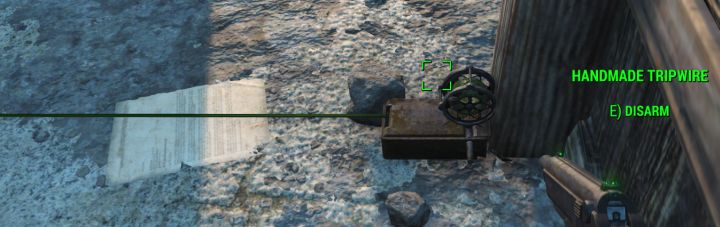
 This exploding barrel trap isn't hard to get around, you can blow it up from a distance or disarm the tripwires.
Going up the stairs, move quickly across the board bridge as it breaks. There's yet another trap (a gun) should you fall. Next up, there are exploding barrels with tripwires attached. You can blow them up and spoil the fun, or else disarm the traps. Around the corner is a safe with a tension trap attached to it, as well as a corpse with a letter.
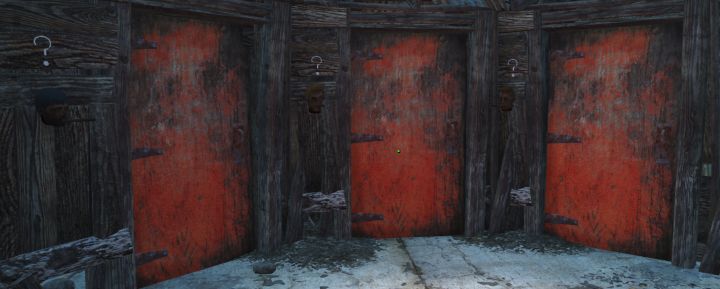 The three doors are not as dangerous as made out to be. The monkey's creepy as usual though.
Coming to the three doors
The right door will drop four grenades and is a waste of time, aside from getting to stand back and watch the explosion. The center door is worth opening just for the minor dialog. The left is correct.
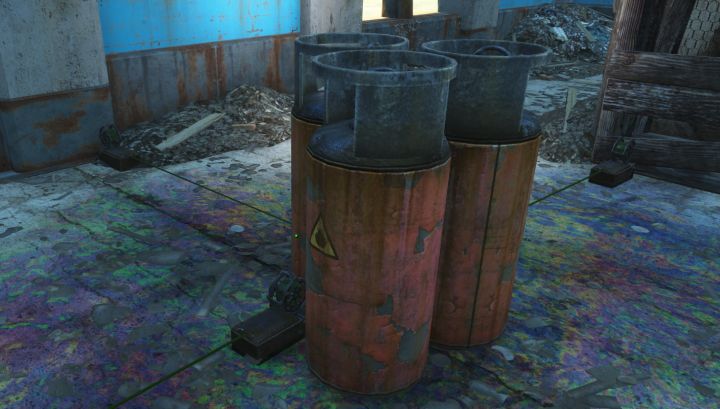
 The Rusty Key is what you need to get out of the radiation barrel room in the Gauntlet
How to Get Out of the Irradiated Room
The next area will test your radiation resistance. Rad-X and RadAway will be needed, as you may be moving slowly. In this room, near the collapsed ceiling you can find a corpse with a note (ramblings) along with a radaway box and some supplies. Hidden in corners of this room are a pair of keys, each in a different spot. Neither of them matter if you're able to pick an expert lock. If you can't open the red door, know that what you need to unlock the red door is the rusty key that is in the far right corner of the room (facing from the broken floor that led down), behind the counter and a shoddy wooden wall. You'll find the key next to a small tool case, on a shelf in that alcove. Get out before you blow through radiation items.
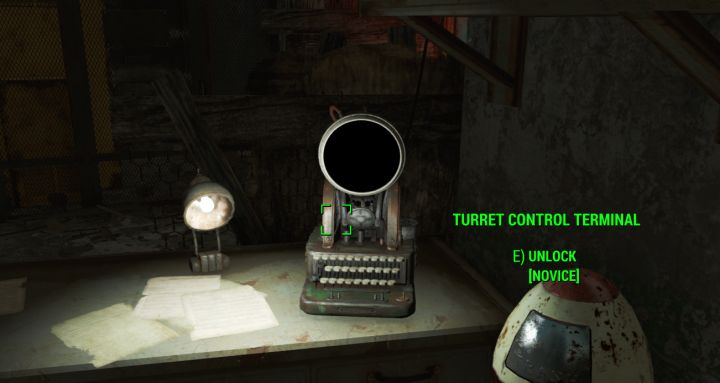 Don't use this computer, unless you've got a fat man on you. There are about 10 turrets stacked on shelves in the next room.
Nuka World Access Tunnels
Now you're through with a majority of the gauntlet. Enter the Access Tunnels door and, if you want help avoiding the next trap, do two things. Do not touch the turret control terminal as it will not help you, only activate turrets in the next area prematurely. The solution is to shoot the monkey's head off before it activates in the next room. This will prevent them activating entirely.
Grab the key on the white terminal behind the monkey if you can't unlock an expert-level door. Now you're on to the next area.
 This area has a lot of mines, it's easy to tell when you're going the right way by finding this alien, going up the stairs, then seeing the fusion core.
Mine Maze
The next portion is a mini-maze. There are bathroom scales, makeshift bombs, and land mines, all of which need disarming to proceed. Look out for the animatronic alien and simply kill it on sight. Around the corner from the alien are the stairs you use to get out, though you could continue to explore and possibly find a holotape and loot in the far corner of the room. Standing on the stairs, head left until you see a fusion core to know you're going the right way.
 The mines are actually pretty dangerous here, if you neglect one you could potentially set off a chain reaction.
Frag Hall
Now we're in a large corridor with trucks, and many many frag grenades on the ground. It's one of the most dangerous parts of the Gauntlet. You've got to disarm them one by one as you proceed. Past the initial turret, I encountered no resistance in this area, though it's dangerous. Some of those trucks can blow up, too! Don't worry if you can't unlock the advanced security door, it's just got an explosive box for you, nothing major.
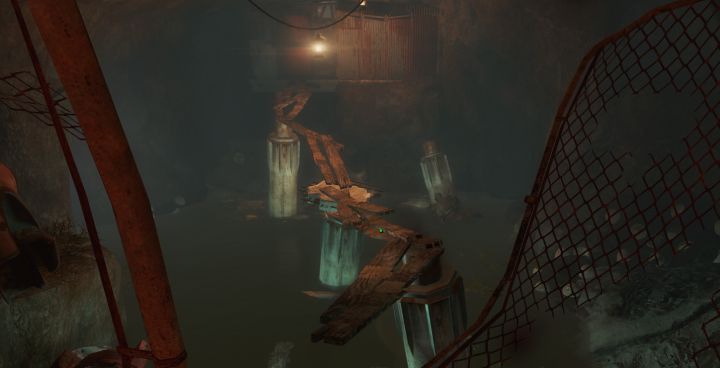 Crossing the bridge simply leads to an expert-locked door. If you can't pick it, don't bother trying.
The Bridge
Now you'll come to a bridge made of wooden planks. Don't even bother with it unless you can pick an expert lock. It's a shortcut. Falling will result in mirelurks attacking you, so it's better to start aware of that rather than drop down and get attacked right away. There's a legendary, but you should probably take out the weaker ones first to give yourself room to maneuver. Leaving this room, beware the door (with a trap you may disarm) as it has four grenades that attempt to kill you upon opening it. If you can't disarm it, open it and step back quickly.
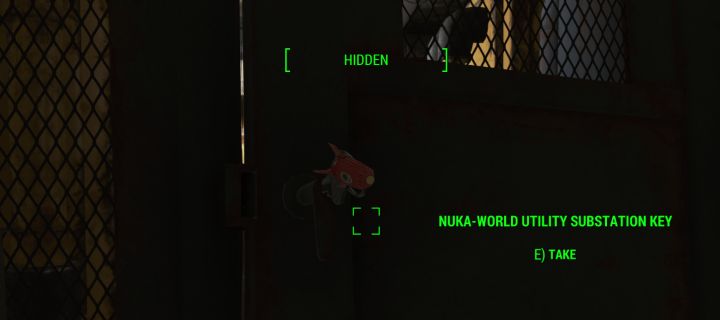
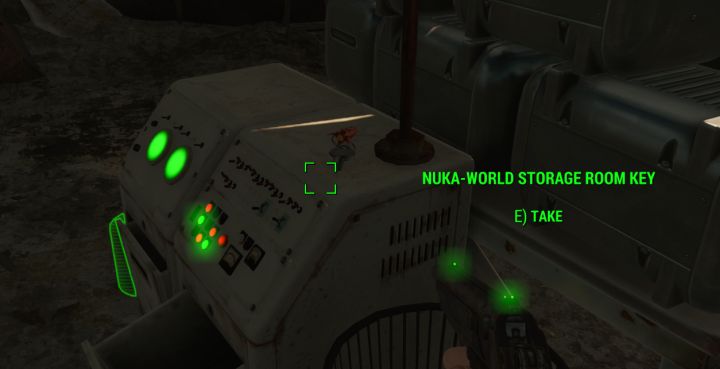
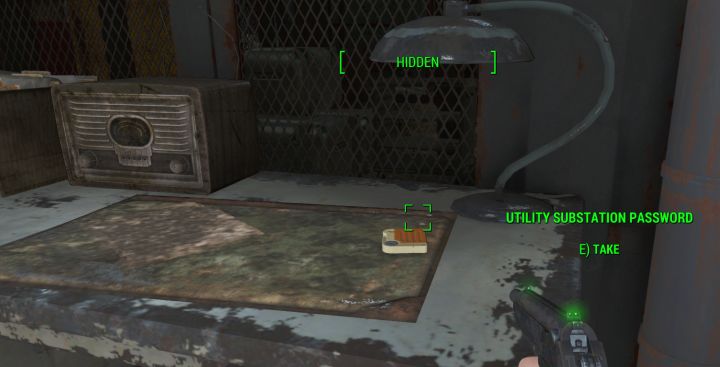 The key for the gas room is found still in a door. The password is on a desk. Get out of that awful room, and avoid firing weapons as much as possible (use VATS to avoid damage from explosions).
Turn off the Gas
Now you're in the room with the sign outside that says, 'Utility Access'. You'll get locked in and choking gas will fill the room. In all areas, firing your weapon will result in an explosion at the point of impact. Head to the far right corner of the area and look for the circular gas valve. Turning it is a waste of time, look behind you when facing it, and look for the Nuka World substation key on a door. Look at the valve and go directly east, look for the desk and the substation password. Now back to the entrance of this room, where you can use that key. Beyond that, a terminal that can ultimately be used to unlock the security door back from near that gas valve and the key.
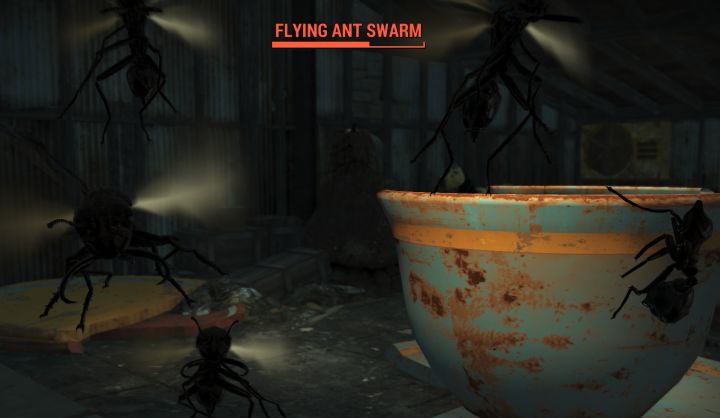 Flying Ants. When you see these, there's a bed nearby for Survival mode or a rested bonus.
Flying Ants and a Bed for Survival
Having escaped the gas, you're now in a Nuka World park shed. Inside - flying ants, a new enemy type in the DLC. They're super weak to burning damage, but aren't particularly dangerous on their own. Players doing a survival run probably don't read my guides, and could likely teach me a thing or two, but they'll be happy to find the sleeping bag behind the novice-locked door in the shed room.
 You're at the home stretch when you get here. Spectators start trying to kill you. Fight back and make progress toward the door, the enemies are not important.
The Home Stretch
Entering the next area, note the fencing as opposed to a ceiling. An ambush awaits, where you'll find high-level enemies from the various gangs. Going through this area, there are also grenade bouquets you should disarm as well as turrets on your level. The fencing makes it hard to avoid enemy gunfire, though it's not like they're invulnerable (it's a fence, not concrete). You do not at all HAVE to fight them, but knocking out a few may be necessary if they become stationary and keep firing. Some will run toward some unknown goal.
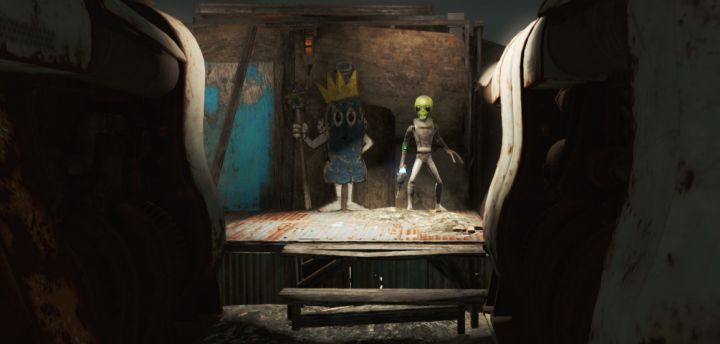
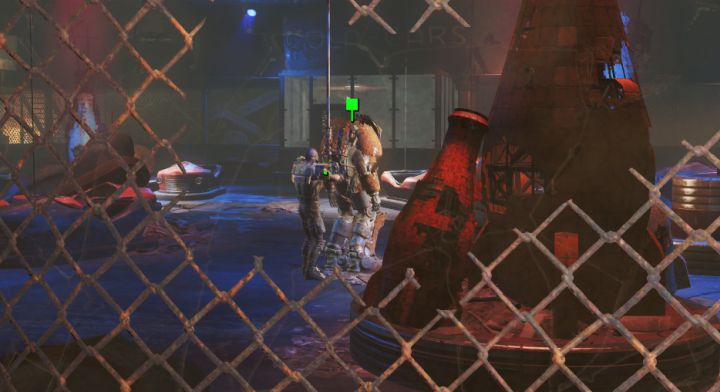 The Overboss, the final challenge of The Gauntlet in Nuka World
Make it to the door at the end and you're at 'Cola Cars Arena'.
More Fallout 4 Guides
Share Tips and Strategies Below
- Raider Outposts in Nuka World
- Nuka World - Play as a Raider in this DLC
- Far Harbor - Learn about the DLC, its secrets, and read walkthroughs
- Automatron - Guides to building bots and quest walkthroughs
- Settlements - An in-depth guide to Settlements and managing them
- Melee Build - the best perks for a melee character
- Sneaking - Learn to be stealthy
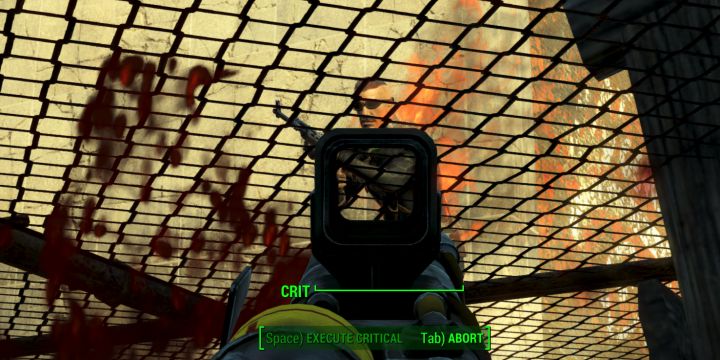
- Critical Hits - Shots to Crit and Crit damage mechanics
- Tips for Making a Build - General advice for creating your own build
- Action Points - AP and all the things that affect it
- VATS - all about the V.A.T.S. and AP usage on weapons
- Gameplay Tips - pointers that will help new players
- Making a Sniper Rifle Weapon mod examples. Heavy hitter and fast-firing Comparison - two guns from the same base.
Share Tips and FAQs
Nothing yet.Join In