- New - A guide to making a Pistol/Gunslinger Build
- New - A guide to making a Melee Build
- New - Scav Magazine - All locations and details
- For New Players - Read the walkthrough.
- New - Open Season
- New - Power Play Quest
- New - Raider Outposts
- New - Nuka World Endings Guide - Options and Benefits
- The Grand Tour
- Faction Perks and New SPECIAL Ranks in Nuka World
- Gage (Companion)
Fallout 4: Minutemen Quest
When Freedom Calls and the Museum of Freedom
 The Museum of Freedom is home to one of the first major quests in Fallout 4, "When Freedom Calls". It's largely optional, though recommended on a first playthrough.
When Freedom Calls is not actually a part of the Main Quest in Fallout 4, but it will direct you toward where you need to be to proceed with the story. It is actually the first in a series of early-game quests that are optional and lead you to learning about the Settlements System (Guide) in the game. It hardly needs a walkthrough, but I wanted to get to point these things out with newcomers and sprinkle some tips throughout the article. It's an entirely optional quest that leads you to be a part of an entirely optional faction! Just clearing this up as I didn't know this on my first playthrough. In fact, there are several things you can skip to advance the main quest.
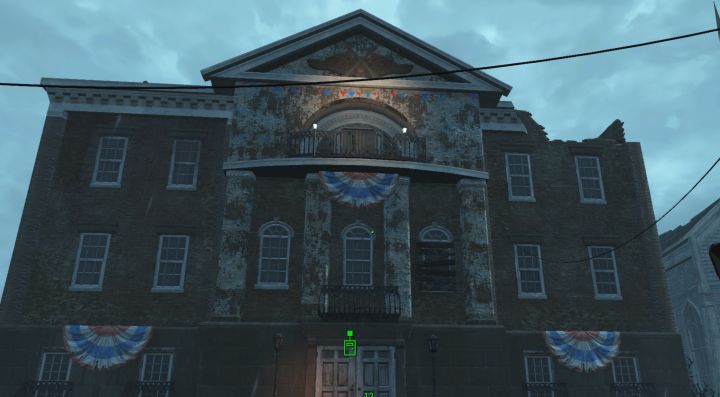
Museum of Freedom
 Armor you find may not be great, and can leave your character looking a bit silly, but it's good protection for later quests and dangerous encounters.
Codsworth will have likely directed you toward Concord, where you will find the Museum of Freedom and a battle in progress between the Minutemen and raiders. Arriving here will give you a nice chunk of XP for completing the game's first quest, 'Out of Time'. Given the corpses outside - both raider and minutemen - contain some great loot, it's suggested you take it. Should you desire to walk away, you can. However, it's not an awful idea to proceed inside and help as you can earn some very easy experience and learn a bit about combat.
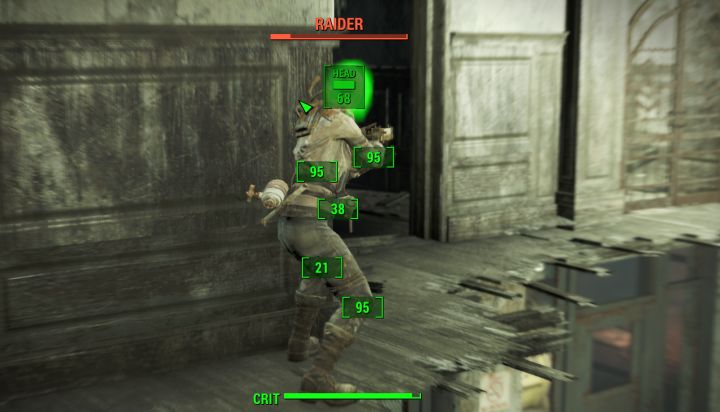
 Kill raiders and loot containers to fully gear your character with leather and raider armor. You should also find a few good weapons, along with ammunition.
You should not need VATS much here except in close quarters, given many of the raiders are distracted fighting the settlers. Kill and loot their bodies, and you'll probably find yourself fully armored, even if you look a bit goofy. Don't let the battle make you hasty, loot containers and the like along the way as you can find plenty of helpful materials in here. If it's just a shovel, don't take it. DO take objects like glue and duct tape. Heading upstairs, you will meet one of the game's many possible companions and frequent quest-giver Preston Garvey.

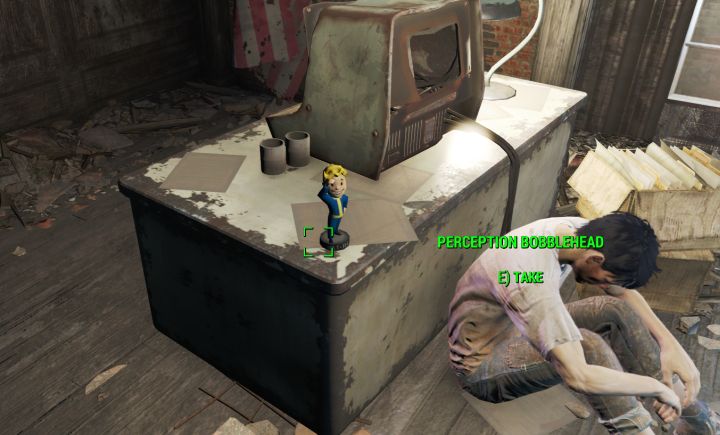 Meet Preston Garvey and learn about these Settlers' situation, then consider whether to take the Perception Bobblehead or save it for later in the game.
Inside this room is the Perception Bobblehead. If you one day want to have 11 Perception, which increases your accuracy when using VATS, then do not take it. This is the only way to push your base stats past 10 - to save Bobbleheads until you've raised that stat to max, then take it. You can easily come back for it later, but this is the perfectionist's route. It'll help more now! Each point raises your accuracy by 4% over what you would normally see in VATS (so an 80% chance to hit becomes 83%), while also giving you access to higher-rank Perception Perks. Also, there's an issue of Robco Fun on the desk with the computer terminal. This gives you a mini-game, while other magazines in Fallout 4 provide permanent perks which increase a particular stat. They're scattered all over the game world and are fun to collect.
You can speak to the other settlers to learn a bit about the world, in particular Mama Murphy who has some... baggage.
 Hacking terminals is one of several things you'll need to learn to do. If you need help with harder ones, see the tutorial linked below.
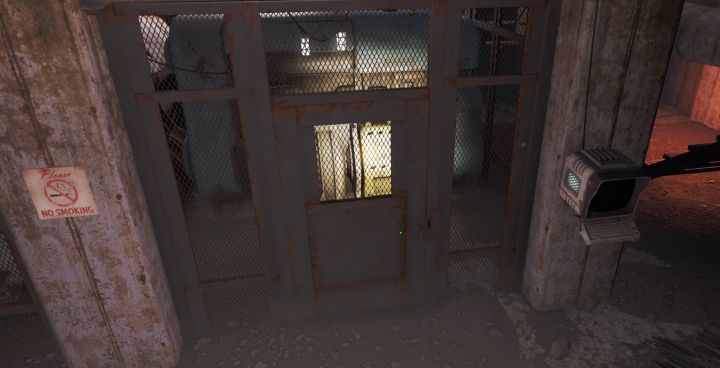
Getting the Fusion Core
Garvey and Sturges will direct you back downstairs, where you can learn to hack terminals (tutorial) in order to get a fusion core in order to power up the Power Armor on the roof. If you have explored some areas already, you may even have a fusion core (or even picked this one up on your way to the settlers), but you may as well get the freebie behind the locked security door. Once you have it, you can return upstairs and go past the settlers toward the roof.
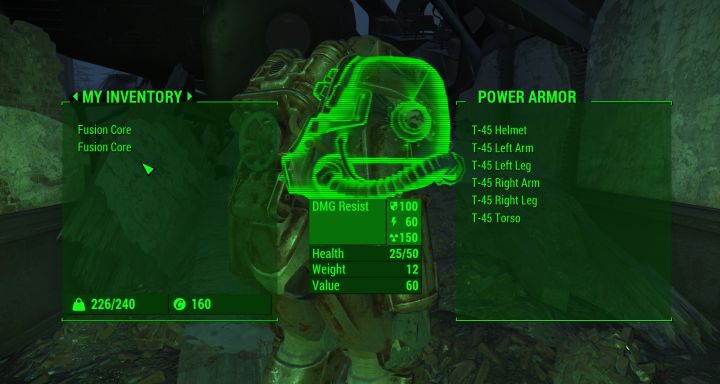 Inspecting the Power Armor brings up a menu. You can transfer the fusion core this way, then exit the menu. Once it's powered, you can enter it and grab the minigun
The Power Armor
In a break from series tradition, you're given Power Armor very early in Fallout 4. However, there's a catch. It's a low-quality variant and it runs off of fusion cores, which drain over time. This means you cannot use it constantly until you have saved some up or are lucky and can find/buy them frequently.
The holotape on the desk on the museum's roof has some interesting backstory for how the vertibird crashed there, but your main goal is to get the fusion core into the Power Armor. You do this by walking up to it, inspecting, then using the 'Transfer' option. Pick the Fusion Core and put it into the Power Armor, which will then let you enter it. Power Armor will function without one, but you're limited in movement speed and cannot use VATS. You can, however, fast travel so that you can park it somewhere. Thankfully, Power Armor locations are always indicated on the map. If you park one with a fusion care, be sure to remove it so that NPCs will not enter and steal your armor.
Using the Armor
Once you're inside the armor, you can take the minigun from the vertibird. Now you're ready to shred some raiders. Given the extreme ranges, it's better to just jump down to the ground. Power Armor lets you fall great distances without suffering any damage. You're not quite invincible in power armor, but the raiders will be much easier to hit if you do this, and you'll save some ammunition for later. It is a survival game after all.
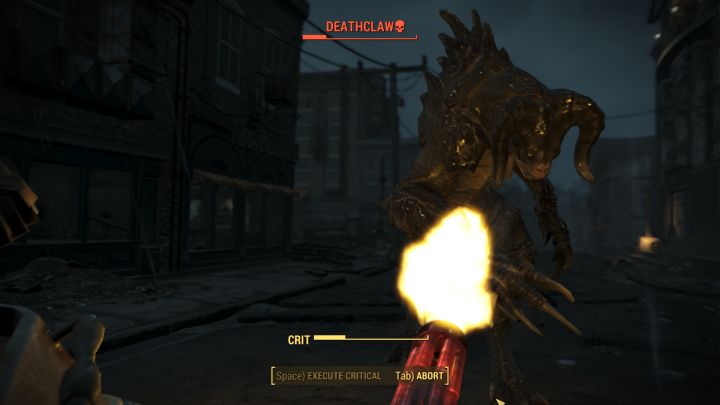 Deathclaws should be shot in the limbs, head, or belly.
Take out the raiders one by one, and as you proceed down the street a surprise encounter will occur - another thing you wouldn't normally see until later in a game. A Deathclaw encounter. One thing to know about Deathclaws is that they are actually resistant to damage when shot in the 'body'. Targeting the limbs and head have a 1.0 damage modifier (normal), while the body takes only 1/3 damage. Their weak point is the belly, where they can be hard to hit at times. Regardless, if you use VATS and the belly is not targetable, don't waste time shooting its armored body area. You should be able to take it down easily with a minigun and power armor.
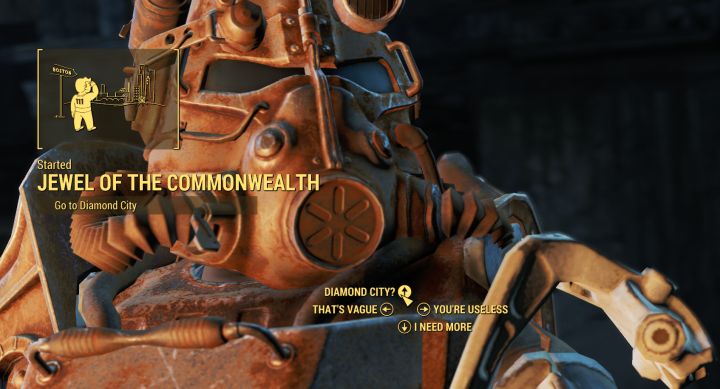
Once all the raiders are dead, you've finished one of the first major quests in Fallout 4 and certainly proven yourself to the settlers and Preston Garvey. Go inside to talk to them, and you'll be given the quest, 'Jewel of the Commonwealth' - to go to Diamond City in search of Shaun.
 Having finished When Freedom Calls, options open up to you - go with the settlers to join the Minutemen and rebuild Sanctuary using Fallout 4's Settlements system, or else continue onward toward Diamond City.
Options
Fallout 4 does offer plenty of options in where you go and how you approach certain things. Now you can choose to go back to Sanctuary (where you started) with the others, or head for Diamond City. The first option teaches you about Settlements and lets you join the Minutemen. The second continues the main quest. You can, of course, put both of these things off and simply explore and have fun! To learn more about Fallout 4's gameplay systems, see some of the other guides listed below.
More Fallout 4 Guides
Share Tips and Strategies Below
- Raider Outposts in Nuka World
- Nuka World - Play as a Raider in this DLC
- Far Harbor - Learn about the DLC, its secrets, and read walkthroughs
- Automatron - Guides to building bots and quest walkthroughs
- Settlements - An in-depth guide to Settlements and managing them
- Melee Build - the best perks for a melee character
- Sneaking - Learn to be stealthy
- Critical Hits - Shots to Crit and Crit damage mechanics
- Tips for Making a Build - General advice for creating your own build
- Action Points - AP and all the things that affect it
- VATS - all about the V.A.T.S. and AP usage on weapons
- Gameplay Tips - pointers that will help new players
- Making a Sniper Rifle Weapon mod examples. Heavy hitter and fast-firing Comparison - two guns from the same base.
Share Tips and FAQs
Nothing yet.Join In