- New - A guide to making a Pistol/Gunslinger Build
- New - A guide to making a Melee Build
- New - Scav Magazine - All locations and details
- For New Players - Read the walkthrough.
- New - Open Season
- New - Power Play Quest
- New - Raider Outposts
- New - Nuka World Endings Guide - Options and Benefits
- The Grand Tour
- Faction Perks and New SPECIAL Ranks in Nuka World
- Gage (Companion)
Fallout 4 Combat Rifle
Weapon Modifications, Upgrading, and Base Stats
 Combat Rifles are highly-versatile weapons with uses for sniping, close range low-AP situations, and powerful automatic fire with the Commando Perk.
Combat Rifles are stable, fast-firing weapons that compete with the Hunting Rifle for snipers' attention. They can be modified to work with either Commando or Rifleman, and will likely be used heavily as strong automatic weapons but do work well for a rifleman specialist's uses. Snipers may desire one of these as an alternative for close encounters, thanks to the improved fire rate and substantially larger clip. Here are the combat rifle's base stats, before I get into the various modifications one can make to the gun and how they affect hidden attributes like AP cost.
Combat Rifle Base Stats
| Damage | Rate of Fire | Clip | Range | Accuracy | AP Cost |
|---|---|---|---|---|---|
Combat Rifles use the common .45 caliber ammo type, but can be modified to use .308 rounds (the Hunting Rifle's default). They cannot be made to .50 weapons, which is one of the drawbacks of using the gun as a primary sniping tool. It just cannot hit the high damage numbers a hunting rifle can, and suffers from a slightly shorter range (albeit less than 5%). Combat Rifles, being more advanced weapons than hunting rifles, will require more investment in Gun Nut to make a major difference. It is certainly one of the best weapons to use in a Commando build, however, because of the solid automatic receiver options.
Crafting: Combat Rifle Weapon Mods
The following are general advice on how the stats are modified on a base Combat Rifle using data you see with the Better Weapon Mod Descriptions Fallout 4 Mod by Takaru Minari installed. This should be helpful to players who do not like using mods or are playing on Xbox or PS4 and do not have access to them.
I originally planned tables for all weapons, but it's a daunting task. I've instead elected to give general info on certain types of parts and how they affect hidden things like VATS cost, critical damage, and recoil. Many of the best weapon upgrades require you to have at least a couple ranks of Gun Nut, and some require Science. I have a page on finding crafting materials, as well as adhesive should you need help with that.
Combat Rifle Receivers
As Semi-Auto (Rifleman)
This is where the largest differences between a hunting and combat rifle reside. Hair Trigger will bring the AP cost down to 30, as will the upgrade to .308 ammo (same as a base Hunting Rifle), but it takes Rank 4 Gun Nut. This will make it an effective sniping tool that is good for VATS use and with a good AP pool may let you make a couple more shots than you could with a hunting rifle, which may make it work with Perks such as Gun-Fu and will certainly allow you to take advantage of Critical Hits more often than a Hunting Rifle would.
With a high-Luck build, you'd possibly be better off using the Calibrated Powerful Receiver which will increase the Critical Hit multiplier by 100%, allowing you to do much more damage overall. It just depends how many shots you take to build up the crit meter, and how often you'll be using the gun.
As Fully Automatic (Commando)
Combat Rifles can be made to be automatic and deliver a burst of 3 rounds for 39 AP with Rank 1 of Gun Nut, this brings damage down to 23. The Rapid Automatic is better in that it will fire faster outside VATS for the same AP cost. Given the low damage of the rifle in automatic form, for VATS use the armor piercing variants are better in that they do not sacrifice damage in order to slightly bump the rifle's damage against armored opponents.
With Rank 4 Gun Nut (or if you find the part on another weapon and can swap it in), you can choose to have a powerful automatic receiver which makes the gun's base damage 38, or go with the Hardened Piercing Auto Receiver (R3 Gun Nut) for 31 damage and pierce 40% of an opponent's armor. The former is better for mowing down lightly armored opponents, but the latter is going to deliver more damage when you're facing a heavily armored opponent. The powerful is great for standard use against raiders, but without heavy investment in Commando heavily armored enemies will laugh at your 31 damage regardless of armor piercing.
Barrels
Along with the receiver, the Barrel you choose will greatly change the weapon's strengths. A normal long barrel has a +10% AP cost modifier, while providing nearly double the range. Dropping to a short barrel (or short light) could bring it down -20% or -25% in terms of AP cost, but greatly increase the spread of the weapon while dropping range. It's only good for close encounters at that point, but may be great for a sneaky build to pull out when their .50 cal hunting rifle or gauss is showing its weakness at short range due to slower firing rates.
For players with Commando, ported barrels will reduce recoil and allow you to stay on target when firing manually - whether you choose to go short or long range with the weapon is up to you.
Rifle Stocks
The stock that is right for your Combat Rifle depends how you will be using the weapon. All full stocks increase VATS cost by 20%, which means that going to a short stock could shed 5 AP off the cost to fire the weapon (full stock is standard). A short stock will be worse for manual sniping, but better for VATS sniping because of this. If you upgrade the Combat Rifle to .308 rounds and enjoy sniping manually, you'll love the stability a Marksman or Recoil Compensating stock provides.
Magazines
The normal magazine is 20 as noted below. A hidden value on the medium quick-eject mag is that it has the same clip size but a -5% VATS cost, which could shed a point off the cost to fire the weapon. The opposite is true for the large magazine, bringing clip to 40 but increasing VATS cost by 10%. Large Quick eject is probably best, given it has a much faster reload time and a 40 clip size and no impact on VATS. You will certainly want this if you choose to go automatic with the weapon.
Sights
As with all weapons, having a non-scope sight on the weapon will reduce VATS cost. Standard just will not do. You can shed some AP cost here, while also increasing the accuracy of the weapon with Reflex Sights (-15% VATS cost). For sniping, you will likely want at least a short scope (30% increase in AP, but +18 Accuracy). Medium is +40%/+25 Acc, Long provides +50% VATS cost and a whopping 38 Accuracy.
Muzzles
While I consider bayonettes a big no-no given they reduce the range of the weapon with little damage themselves, compensators and muzzle brakes make a minimal impact on range while improving recoil by 10/15% which may be enticing to someone who is using the gun manually in either semi or full automatic form.
Suppressors will make it good for use in Sneak Attack in combination with the Mister Sandman Perk, which increases the Sneak Attack multiplier in combination with Ninja.
Combat Rifle Modded Example
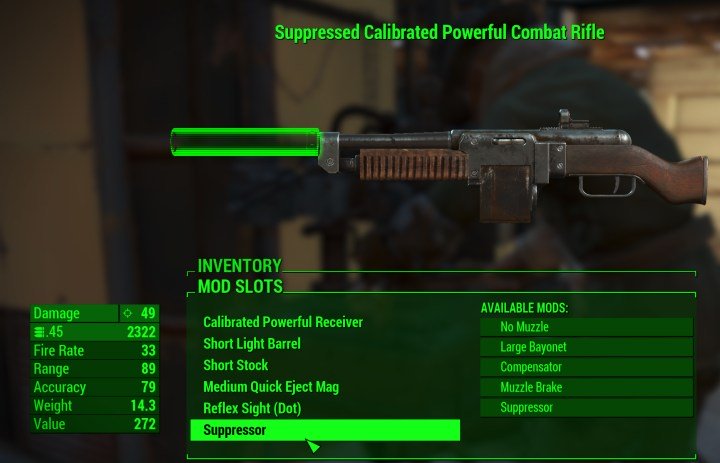 A Combat Rifle modded for close range use in VATS. Its damage would be doubled with 5 ranks of the Rifleman Perk, while also penetrating armor.
Use as a Secondary VATS Weapon for a Sniper
Modding the Combat Rifle with a short light barrel and short stock, along with reflex sights, we can reduce the AP cost to fire it while increasing the damage of the gun with . Since Snipers will take points in Rifleman it's important to retain its semi-automatic form. For this use, the major decision comes down to whether to use .308 ammo and get more damage from average shots, or use the calibrated powerful receiver for better critical hits. Suppressor is optional if you're using Mister Sandman and have good sneaking ability.
This weapon deals 49 to 98 damage (base or R5 Rifleman) but has worse range than many pipe pistols and other handguns, but is meant for tight situations. You could greatly increase effective range with a longer barrel. Snipers should have good Perception if using VATS so the accuracy is likely a non-issue, thus the short barrel. Because of all the reductions to AP cost afforded by the upgrades (or downgrades if you view them as such), it costs only 17 AP to fire yet still deals respectable damage. A Legendary two-shot or relentless variant of this same weapon would be wonderful.
Overseer's Guardian
Doing all of the above or fitting the two-shot Overseer's Guardian, which you can buy in Vault 81 with an automatic loadout are highly recommended. It can be a great weapon until you get a gauss rifle or two-shot .50 caliber hunting rifle (maybe even instigating) to replace it. This weapon is one that can be attained somewhat early in the game (around 2,000 caps) and is wonderful for either short-range encounters as an automatic/low AP cost weapon or Sniping.
More Fallout 4 Guides
Share Tips and Strategies Below
- Raider Outposts in Nuka World
- Nuka World - Play as a Raider in this DLC
- Far Harbor - Learn about the DLC, its secrets, and read walkthroughs
- Automatron - Guides to building bots and quest walkthroughs
- Settlements - An in-depth guide to Settlements and managing them
- Melee Build - the best perks for a melee character
- Sneaking - Learn to be stealthy
- Critical Hits - Shots to Crit and Crit damage mechanics
- Tips for Making a Build - General advice for creating your own build
- Action Points - AP and all the things that affect it
- VATS - all about the V.A.T.S. and AP usage on weapons
- Gameplay Tips - pointers that will help new players
- Making a Sniper Rifle Weapon mod examples. Heavy hitter and fast-firing Comparison - two guns from the same base.
Share Tips and FAQs
Nothing yet.Join In